How to Configure and Setup WISP Mode in OpenWrt Router
OpenWrt is an open source firmware under GNU license. It is developed by the OpenWrt core team to provide additional features for OEM brand routers to speed up router performance more than default firmware.
While upgrading to your router with the OpenWrt firmware you should upload it with the correct firmware, the version that is suitable for your router or else it will damage your router hardware.
In this we provide you the information about how to setup and configure the client router WISP mode in OpenWrt router?
What is meant by WISP?
WISP (Wireless Internet Service Providers) is specially developed for the internet service providers to provide internet over wireless CPE. In this wireless interface will turn into a WAN interface and wireless device will work as a wireless client router.
The below are the steps to follow for setup and configure the WISP mode in OpenWrt Router.
Steps to configure and Setup WISP Mode in OpenWrt Router
Configuration for the OpenWrt WISP mode configuration must be made without errors so read the steps twice and then start configuration.
The below are the steps to follow make OpenWrt router WISP Mode Configuration.
- Before the starting of the configuration your laptop/PC must have same series of IP address in LAN properties. And then start configuration.
- For configuration open the browser in your laptop and type 192.168.1.1 in the address bar and press enter button.
![]()

- Then Openwrt page with Authorization required is displayed on the screen.
- Enter the default user name and password in the login credentials.
User name is root and password has to keep blank and no need to enter.
- After login you will get a yellow color notification that is password is not set.
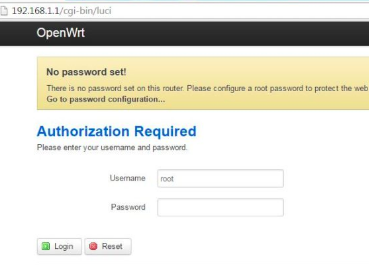

- To set the password click on notification and set up the strong password.
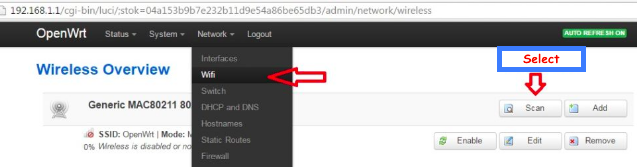
- And then go to Network option click on WiFi and click scan button.

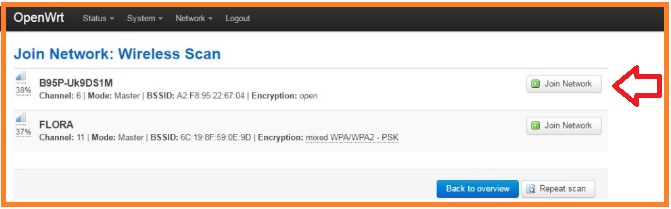
- Then find your network (SSID) and click join network.
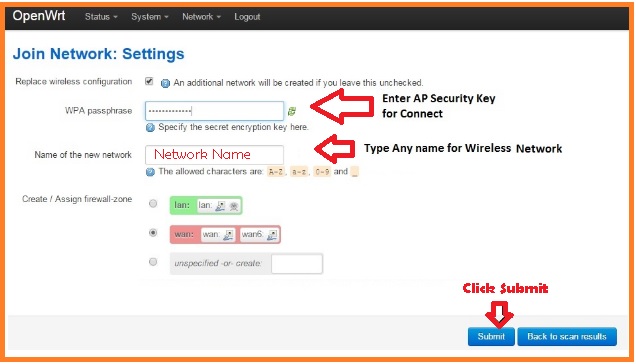
- And then enter your wireless key.

- Next use any name for the new network and click on submit button.
- In the next step of configuration open frequency will auto select as per Access point will get from access point.

- And click on save and apply for settings changes.


- Once you client device connected to AP device then you have to configure WAN interface to get internet from AP side.
If your Access point DHCP disabled or you want to use client as static IP/PPPOE then follow the below settings.
How to Configure as Static Mode in WISP Router
The below are the steps to configure as Static Mode in WISP router.
- Edit WWAN interface to get IP address mode option.
- Click on interface for static and PPPOE interface.
- Choose static if you are using the static IP.
- Or choose PPPOE if you are using the PPPOE server.
- And then select the static address and give the internet IP address as per your network configuration.
- And then click on save and apply changes.
After rebooting the device change your PC/ Laptop LAN to DHCP mode and check the internet connection. for more visit our website https://routerpassword.info/.